Flashing and debugging HealthyPi Move
Get your HealthyPi Move running the latest firmware — choose a method below based on your needs.
Choose your method
| Method | Time | Skills | Best for |
|---|---|---|---|
| Use prebuilt firmware | 5–10 min | Minimal | QA, field updates, no toolchain |
| Build & upload (VS Code) | 10–20 min | Intermediate | Development, debugging, custom builds |
| Command-line (west) | 10–20 min | Advanced | CI/CD, automation, terminal users |
Prerequisites
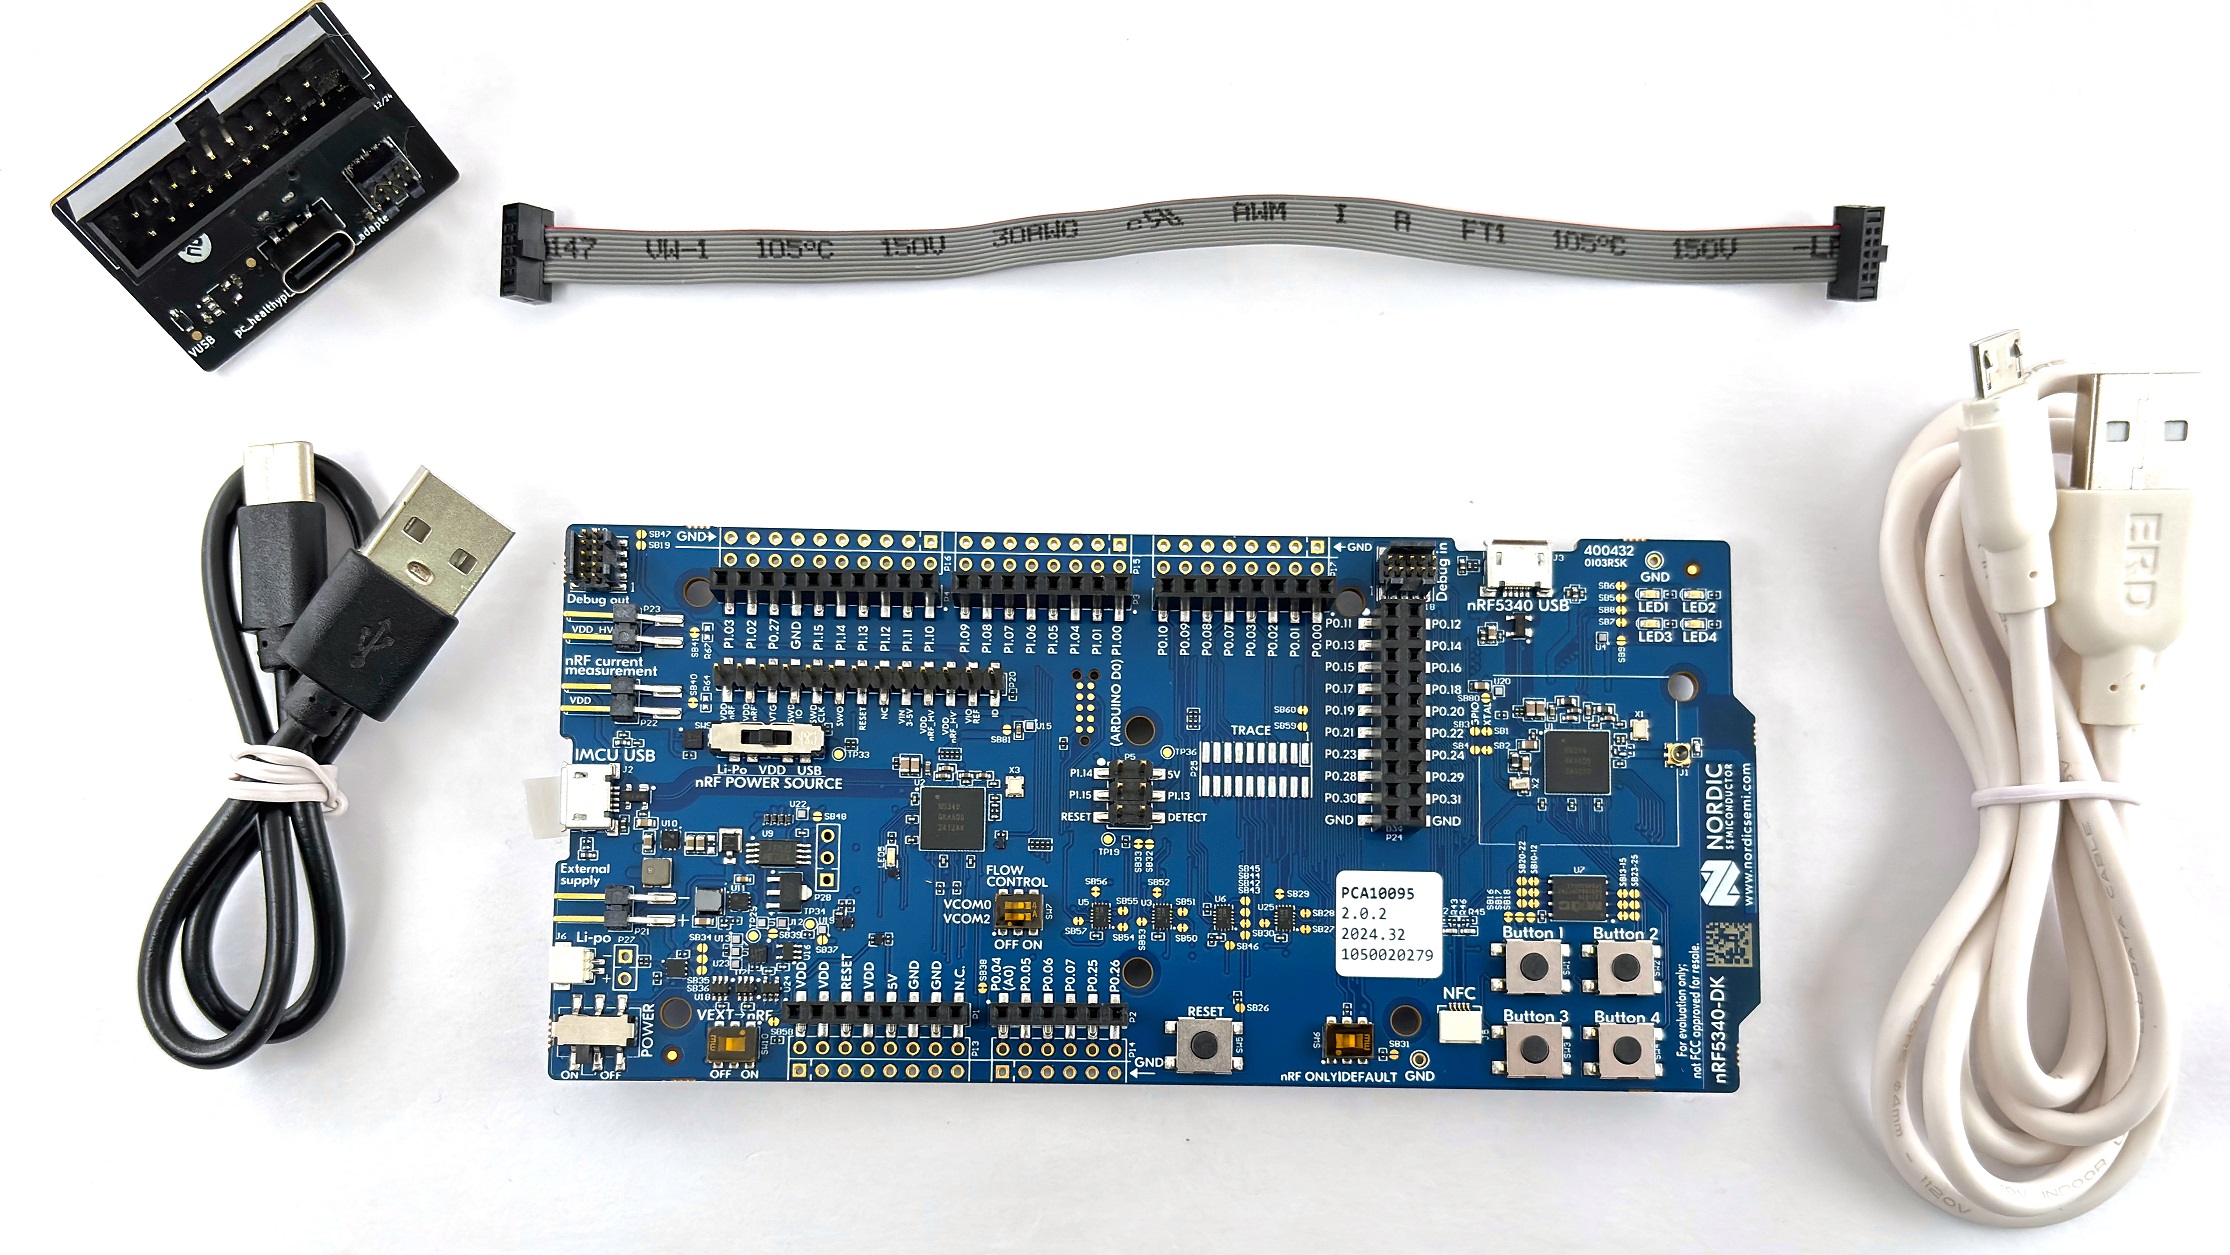
All methods require the same hardware:
- nRF5340 DK (Nordic's debug kit — not included with HealthyPi Move)
- JTAG/SWD cable (connects DK to program adapter)
- Program adapter (connects to HealthyPi Move via USB-C)
- USB-C cable (to power the adapter and device)
- HealthyPi Move wearable device
For methods that use VS Code or command-line, you'll also need:
- nRF Connect SDK and Zephyr workspace (see development/01-setup_zephyr_nRF_Connect_SDK.md and development/02-get_move_firmware.md)
- nRF Connect extensions for VS Code (for VS Code method only)
- nRF Command Line Tools or Segger J-Link (for CLI debugging only)
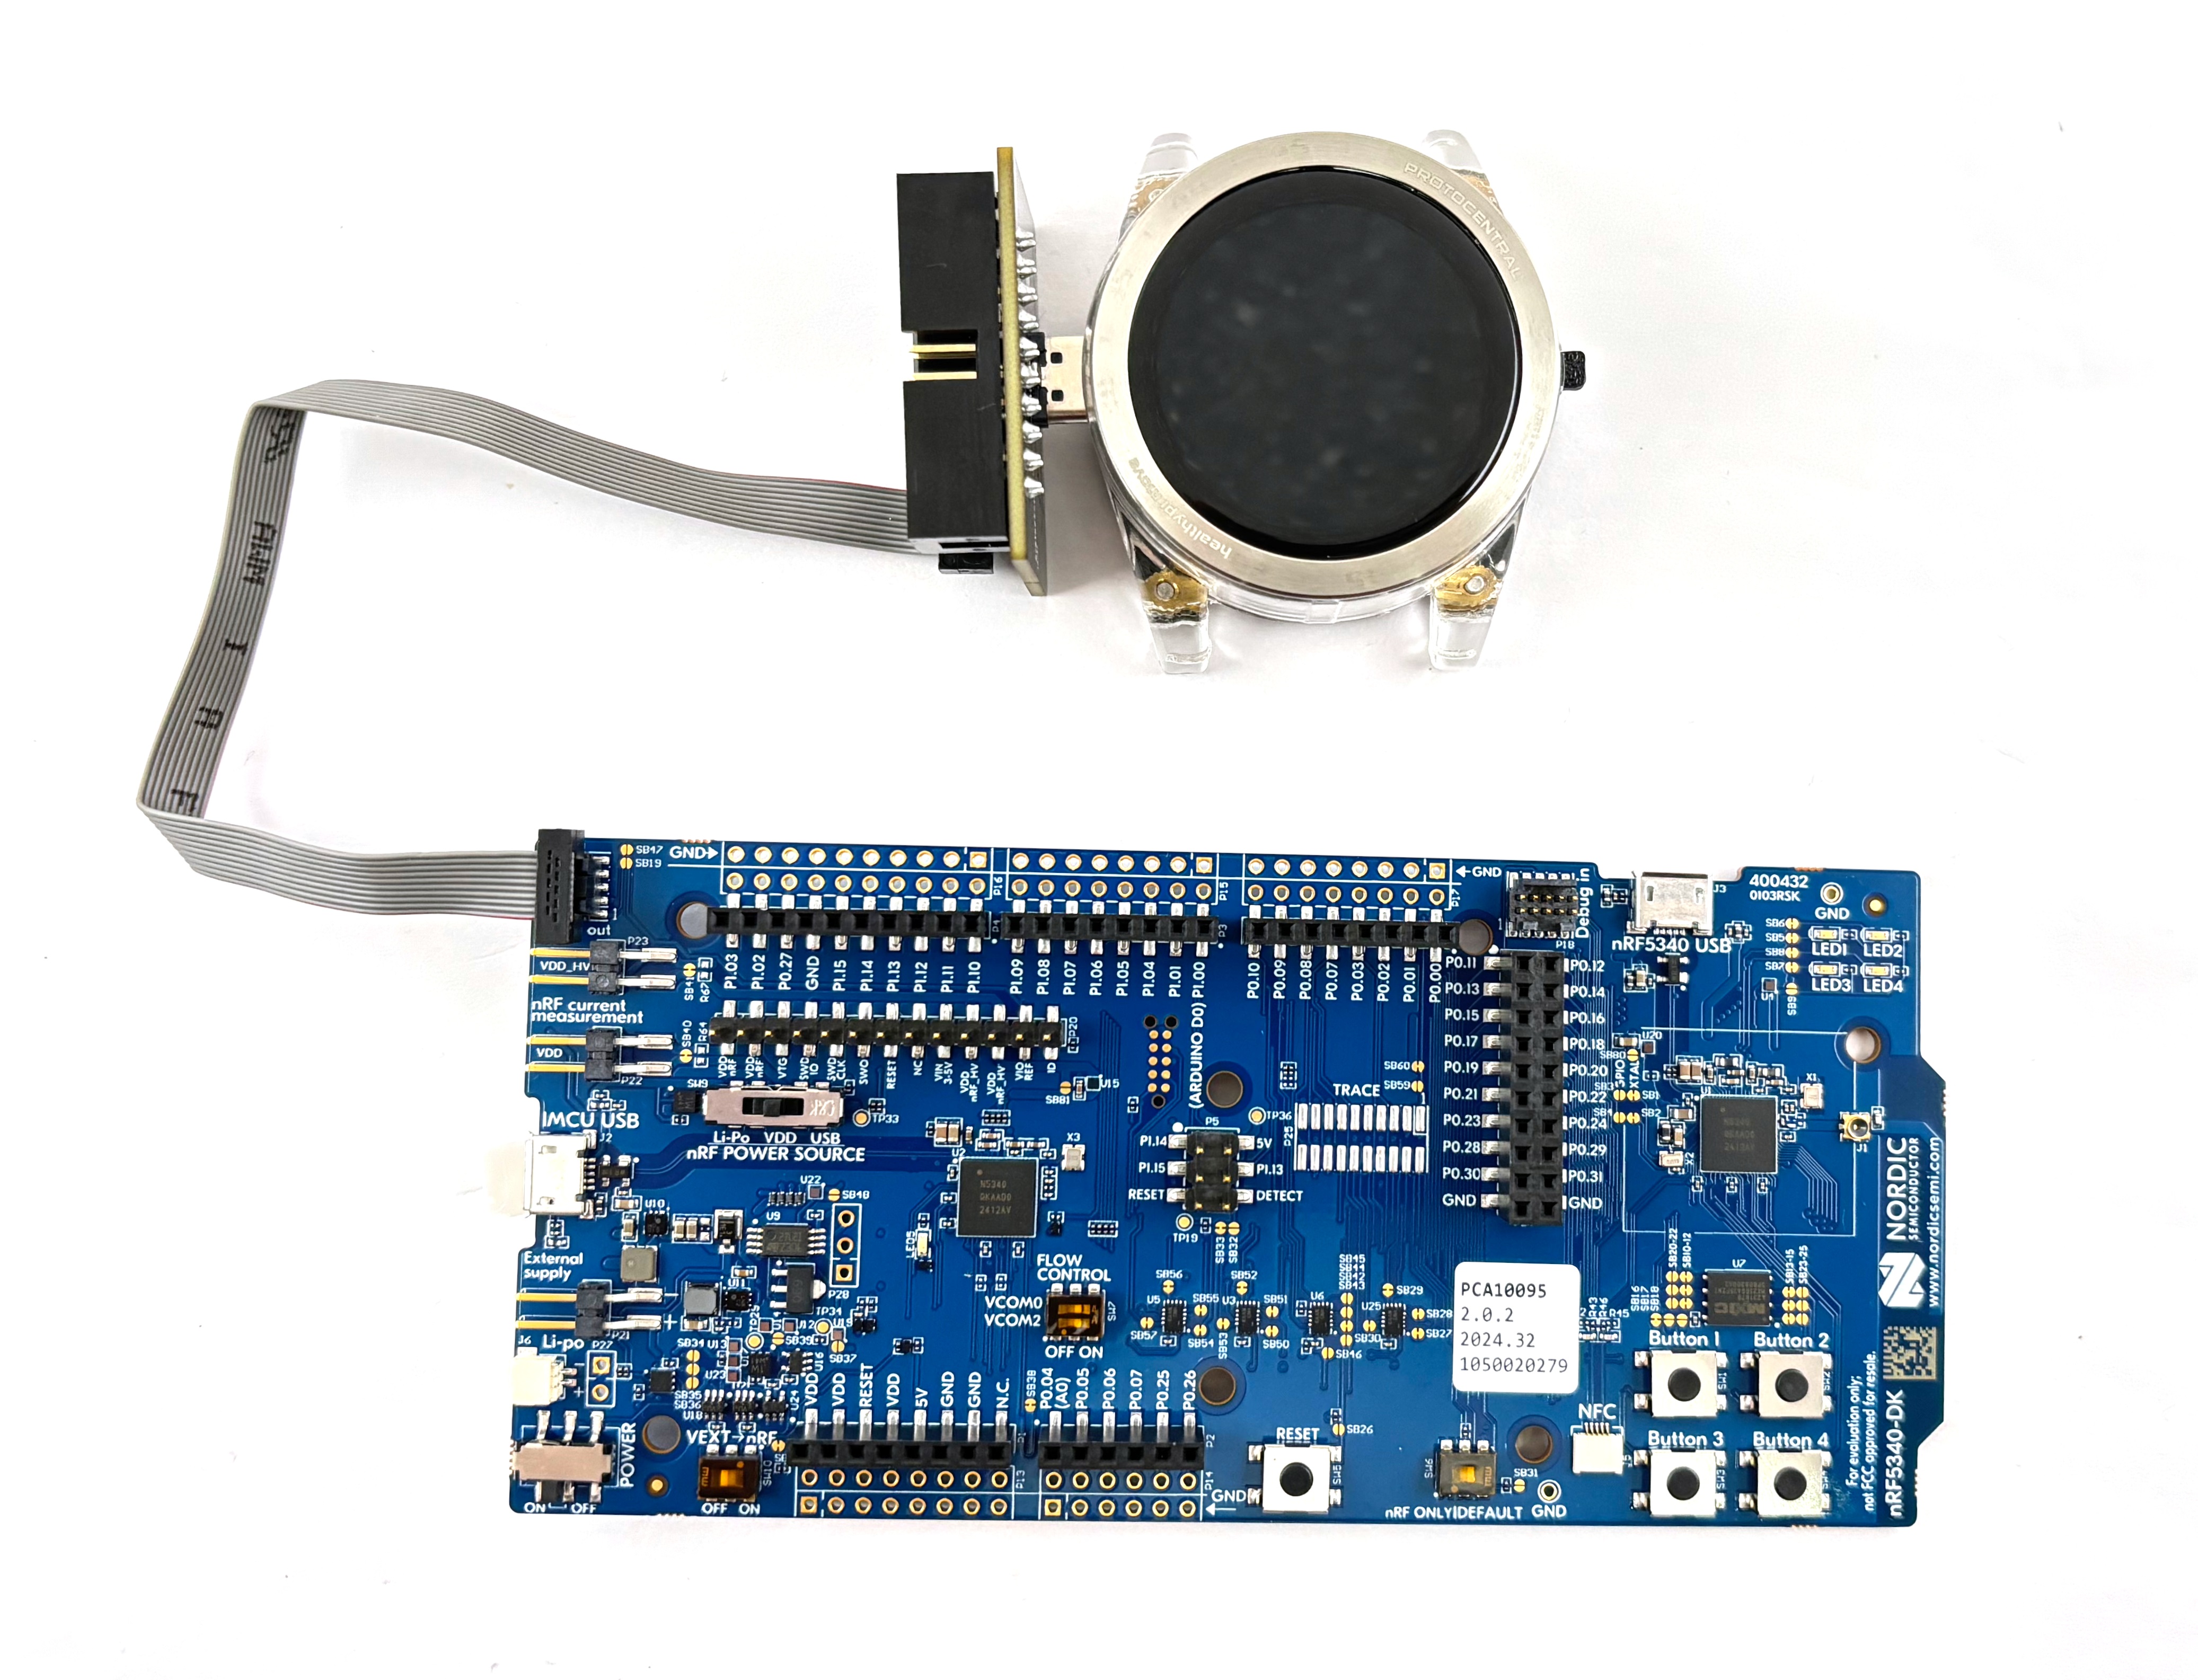
Hardware connections (all methods)
Follow these steps once, then reuse this setup for all flashing/debugging sessions.
-
Power everything down — nRF5340 DK and program adapter.
-
Connect JTAG cable from the nRF5340 DK's Debug port to the program adapter's JTAG header.
-
Connect the program adapter to the HealthyPi Move using the USB-C port on the adapter.
-
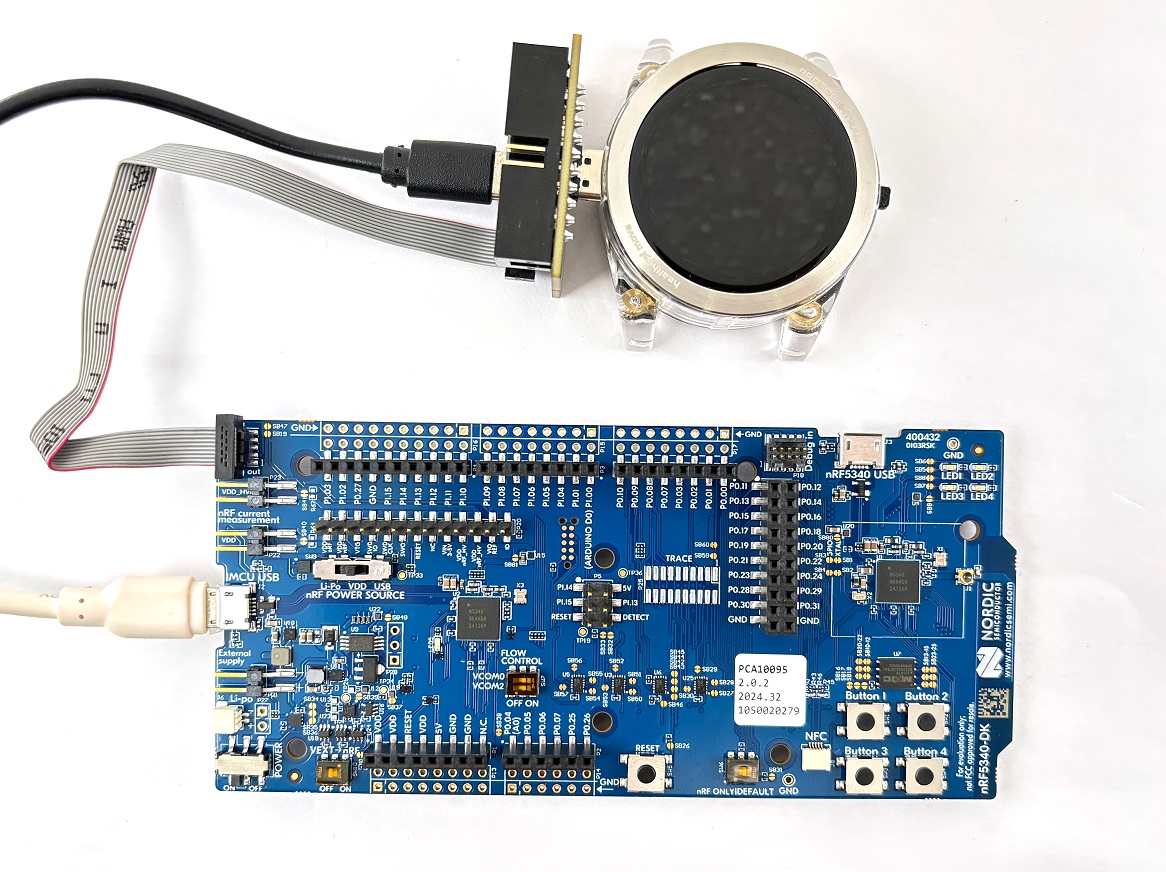
Power the DK via micro USB and power the adapter via USB-C using known-good cables and power supplies.
-
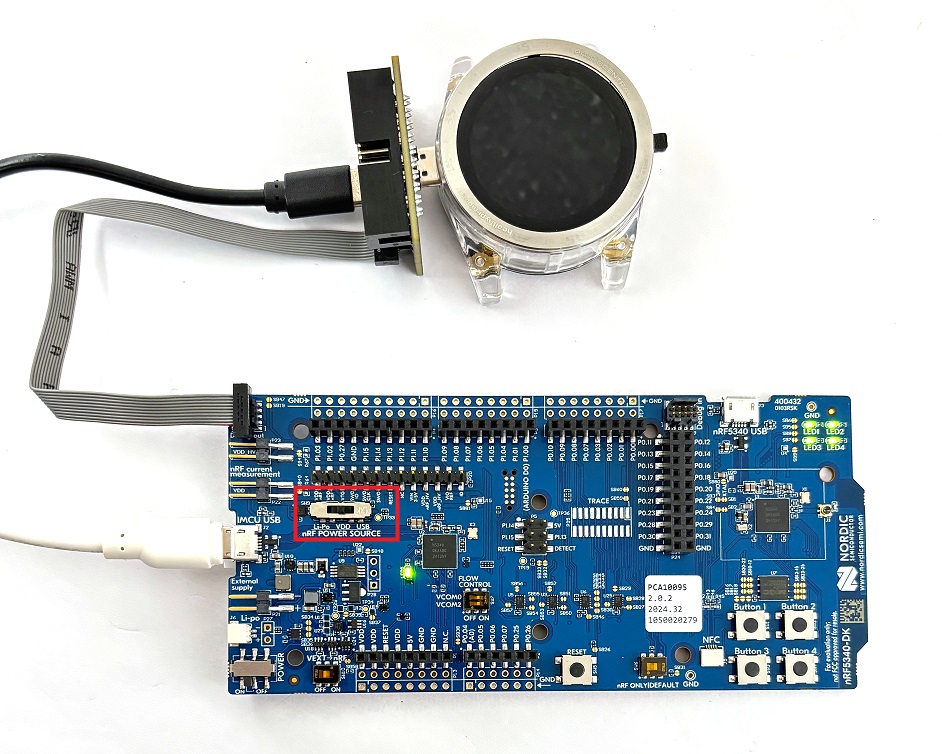
Turn on the nRF5340 DK — flip the power switch. You should see LEDs light up on the board.
Hardware stays connected
Leave your nRF5340 DK, cables, and program adapter connected for all methods below. You only need to set this up once.
Method 1: Use prebuilt firmware (fastest, no compile)
Fastest path: download pre-built .hex files and use the nRF Connect Programmer desktop app to flash the device. No build tools needed.
Step 1: Download the firmware
- Go to: https://github.com/Protocentral/healthypi-move-fw/releases/latest
- Download both
.hexfiles from the latest release (example filenames): healthypi_move_v1.9.0.hexhealthypi_move_cpunet_v1.9.0.hex
Don't use the .zip file
The .zip file in the release is for OTA (over-the-air) DFU updates only. Use only the .hex files for desktop programming.
Step 2: Install nRF Connect Programmer
- Download and install the nRF Connect for Desktop app: https://www.nordicsemi.com/Products/Development-tools/nRF-Connect-for-Desktop
- On macOS: allow the app in System Settings → Privacy & Security after first launch.
- Open nRF Connect for Desktop and add the Programmer plugin.
Step 3: Program the device
- Open nRF Connect Programmer and select your nRF5340 DK from the probe list.
 2. Add both
 .hex files: click Add file or drag both files into the window.
3. Verify the flash addresses shown match the release notes (usually default 0x0 is correct).
4. Click Write or Write and verify and wait for completion.
5. Click Reset or power-cycle the watch — the new firmware should boot automatically.
Done!
Your HealthyPi Move is now running the latest firmware. Proceed to Capturing serial logs if you want to see device output.
Method 2: Build & upload with VS Code (development)
For developers: compile the firmware locally and flash via VS Code. Enables debugging and code changes.
Prerequisites (VS Code method only)
- Zephyr workspace set up (see
development/02-get_move_firmware.md) - nRF Connect extensions for VS Code installed
Step 1: Open the project
- Open the
healthypi-move-workspacefolder in VS Code. - In the nRF Connect panel (left sidebar), click Open an existing application.
- Select the
app/appfolder inside your firmware repository.
Step 2: Configure the build
- Click + Add build configuration.
- Select target board:
healthypi_move/nrf5340/cpuapp - Choose Debug (with symbols for debugging) or Release (optimized).
- Click Create configuration.
Step 3: Build the firmware
- Select your build configuration.
- Click Build in the Actions panel.
- Wait for the build to complete (watch the terminal for errors).
Build errors?
If you see missing headers or Kconfig errors, run west update in the workspace root and restart VS Code.
Step 4: Flash to the device
- With your nRF5340 DK connected and powered (see Hardware setup), click Flash in the Actions panel.
- Watch the terminal — the extension will invoke the appropriate flashing tool and verify the write.
- After completion, the HealthyPi Move will reboot with the new firmware.
Step 5: Debug (optional)
Method 3: Command-line workflow (advanced / CI)
For automation and CI/CD: build and flash entirely from the terminal using west and nRF tools.
Build and flash
From your Zephyr workspace root:
# Update dependencies
west update

# Build for HealthyPi Move
west build -b healthypi_move/nrf5340/cpuapp app/app

# Flash to the connected device
west flash --runner <runner-name>
Common runners: pyocd, openocd, or nrfjprog. VS Code auto-detects the correct one; for CLI, check your setup docs.
Manual flashing with nrfjprog
If west flash fails, use Nordic's nrfjprog directly:
For more details, see Nordic's official nRF Command Line Tools docs.
Capturing serial logs
View real-time device output (baud rate 115200, format 8N1):
VS Code:
- Open the nRF Terminal extension and select /dev/tty.usbmodem* (macOS) or the appropriate COM port.
Any terminal (macOS):
No logs?
Ensure UART is enabled in the board's Kconfig (CONFIG_UART_CONSOLE=y and CONFIG_LOG_ENABLED=y) and rebuild.
Troubleshooting
Flash fails / probe not found
Symptoms: west flash or nRF Programmer fails with "probe not found" or connection error.
Fix: - ✓ Check all USB cables are connected and DK is powered on (LEDs should glow). - ✓ Verify JTAG/SWD cable is seated firmly on both the DK and program adapter. - ✓ Install required tools: nRF Command Line Tools or Segger J-Link. - ✓ On macOS, allow the tool in System Settings → Privacy & Security. - ✓ Close other tools that might lock the probe (OpenOCD, other VS Code windows, SEGGER Studio).
Build fails (missing headers or Kconfig errors)
Symptoms: compilation aborts with "undefined reference" or Kconfig errors.
Fix:
- ✓ Run west update in the workspace root to fetch missing modules.
- ✓ Restart VS Code so the nRF Connect extension reloads the updated SDK.
- ✓ Check that your west.yml manifest matches the firmware repo and select the correct SDK version in nRF Connect.
Device not advertising (Bluetooth app can't find it)
Symptoms: Mobile app sees no HealthyPi Move device in BLE scan.
Fix: - ✓ Ensure firmware flashed successfully (no errors in terminal). - ✓ Power-cycle the watch: hold the power button for 1–2 seconds. - ✓ On mobile, enable Bluetooth and Location (Android requires location for BLE). - ✓ Restart the mobile app.
Debug session won't attach or hangs
Symptoms: Debugger times out or shows "target not halted" error.
Fix:
- ✓ Ensure only one debugger or tool is trying to access the probe.
- ✓ Power-cycle both the DK and the device (sometimes SWD gets stuck in low-power state).
- ✓ Try a different debug runner in VS Code: nRF Connect panel → Select Runner → pick pyocd or openocd.
No serial logs / empty terminal
Symptoms: Connected to the device UART but seeing no output.
Fix:
- ✓ Verify UART is enabled in firmware: check board Kconfig for CONFIG_UART_CONSOLE=y and CONFIG_LOG_ENABLED=y.
- ✓ Confirm you opened the correct serial port (macOS: /dev/tty.usbmodem* or /dev/tty.SLAB_USBtoUART).
- ✓ Check baud rate: must be 115200, format 8N1.
- ✓ Rebuild if you enabled new Kconfig options.
When you need help
Collect this info and post to the GitHub Issues:
- Serial output (screenshot or log file)
- Build/flash terminal output (the exact error message)
- Your environment (macOS version, nRF Connect extension version, nRF Command Line Tools version)
- Photos of your hardware connections (especially JTAG cable seating)
Next steps
- View data trends: see
02-sync_your_move.mdto sync with the mobile app - Update via OTA: see the main Getting Started guide for DFU via mobile app
- More help: visit Nordic's nRF Connect SDK docs or Zephyr docs